# Intended Use and Models
## Intended use
The WLAN Pi product is a wireless networking device intended for use by qualified individuals in controlled educational, laboratory, or testing environments. It is specifically designed for incidental wireless network testing and analysis, with a primary focus on Rx operations. This device is not authorized for permanent installations, continuous transmission, or commercial deployments.
Users are solely responsible for ensuring that their use of the WLAN Pi complies with all applicable local, national, and international laws. Any use outside the specified intended purpose is strictly prohibited and may result in regulatory or legal consequences.
The WLAN Pi development team and its affiliates disclaim all liability for any unauthorized, improper, or unlawful use of the device. By using this device, users agree to these terms and accept full responsibility for its use.
## Compare WLAN Pi models
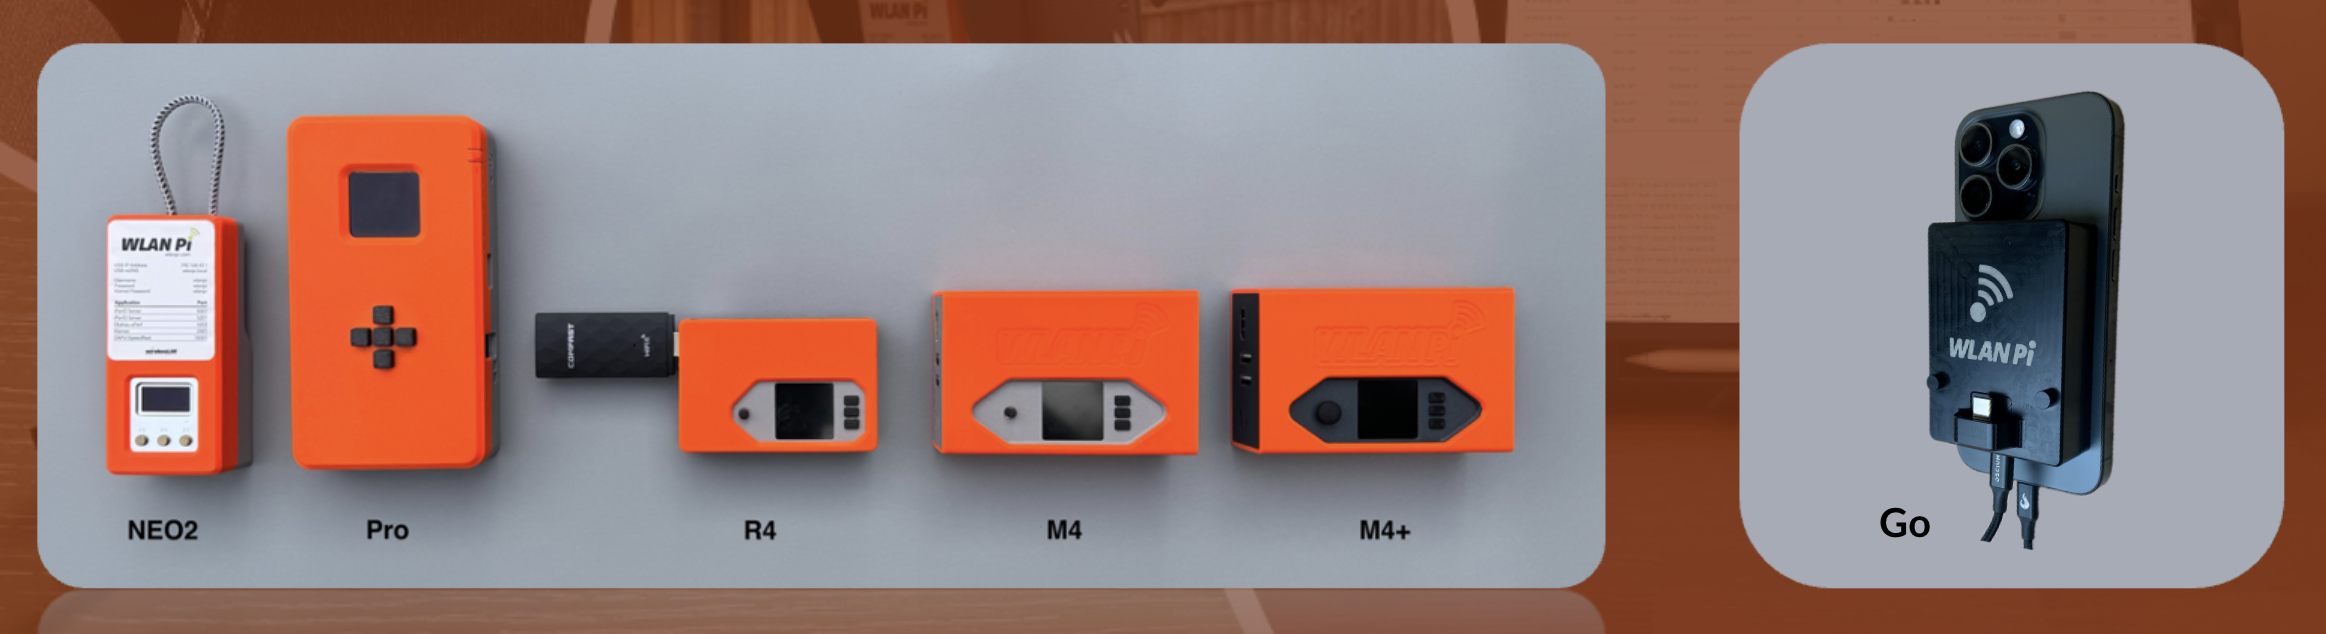
WLAN Pi NEO2, Pro, R4, M4, M4+, Go
Feature
NEO2
Pro
R4
M4
M4+
Go
Wi-Fi 5
true
true
true
true
true
true
Wi-Fi 6
false
true
false
true
true
true
Wi-Fi 6E
false
true
false
true
true
true
Wi-Fi 6/6E (with USB adapter)
true
true
true
true
true
false
Wi-Fi 7 (with M.2 upgrade kit)
false
false
false
true
false
false
Wi-Fi 7 native support
false
false
false
false
true
true
Upgradeable Wi-Fi adapter using M.2 slot*
false
true
false
true
true
true
Display, buttons and menu system
true
true
true
true
true
false
Built-in battery
false
true
false
false
false
false
Can be powered by PoE without accessories
false
true
false
true
true
false
Indication of PoE power input by LED
false
true
false
false
false
false
2.4 GHz or 5 GHz spectrum analysis with Wi-Fi Explorer Pro and Metageek Wi-Spy dBx
false
true
true
true
true
true
2.4 GHz or 5 GHz or 6 GHz spectrum analysis with Wi-Fi Explorer Pro and Oscium WiPry Clarity
false
true
true
true
true
true
Bluetooth IP connection between WLAN Pi and smartphone
false
true
true
true
true
false
USB IP connection between WLAN Pi and laptop/iPad
true
true
true
false
true
true
iPhone cellular internet sharing with WLAN Pi using USB to Lightning cable
false
true
true
true
true
false
Web UI
true
true
true
true
true
true
Profiler
true
true
true
true
true
true
Hotspot mode
true
true
true
true
true
false
Wi-Fi console mode
true
true
true
true
true
false
Server mode
false
true
true
true
true
false
Bridge mode (cellular router with internet provided by smartphone, or wired/wireless bridge)
false
true
true
true
true
false
USB 3.0
false
true
true
false
false
false
M3 optional accessory mounts
false
true
false
true
true
false
M2.5 optional accessory mounts
false
false
true
false
false
false
Built-in 1/4" thread for tripod mounting
false
true
false
true
true
false
\*Replacing the original Wi-Fi adapter has FCC and other compliance implications. The user takes full responsibility for any hardware modifications.
## WLAN Pi OS compatibility
The first version of WLAN Pi OS to support respective WLAN Pi hardware models:
| WLAN Pi Pro | WLAN Pi R4 | WLAN Pi M4 | WLAN Pi M4+ |
| ----------- | ---------- | ---------- | ----------- |
| 3.0.0 | 3.1.1 | 3.1.1 | 3.2.2 |
Download the latest WLAN Pi OS release [from our GitHub](https://github.com/WLAN-Pi/pi-gen/releases/latest).
## NEO2 software compatibility
Please note that NEO2 only supports software images 2.x.x. Newer images 3.x.x software is not compatible with NEO2.
Download the[ latest NEO2 image](https://github.com/WLAN-Pi/neo2/releases) from our Github.
# WLAN Pi Go
## **Introduction**
WLAN Pi Go introduces a new form factor. It magnetically attaches to your phone and allows you to discretely perform Wi-Fi scans or packet capture using a mobile app. It is powered by your phone via USB-C. Alternatively, connect it to your iPad or laptop via USB-C.
WLAN Pi Go magnetically attached to iPhone
## Software and mobile apps
It is powered by lightweight version of WLAN Pi OS stored on its built-in eMMC storage. To upgrade software of your WLAN Pi Go, please [follow these instructions](/hardware/wlan-pi-go/restore-factory-defaults) or use the WLAN Pi App.
Wi-Fi scanning is only available on iPhones and iPads with USB-C connector. Enabled by the WiFi Explorer Pi app.
## **Hardware**
Under the hood WLAN Pi Go uses Intel BE200 Wi-Fi 7 adapter, Raspberry Pi Compute Module 4 with built-in eMMC storage and it features a host USB-C dock port for Oscium Clarity or Lucid spectrum analyzer.
## Product photos
WLAN Pi Go
Wi-Spy Lucid spectrum analyzer connected to WLAN Pi Go
## Learn more
Have you watched our lauch live stream. [Here](https://www.youtube.com/live/3fu2wI68BpM) is the recording.
Attend the [Wireless LAN Professionals Conference](https://www.thewlpc.com/) 2025 in Prague to learn more about WLAN Pi Go.
# FAQ
Frequently asked questions about WLAN Pi Go
**Q: How is WLAN Pi Go powered?**\
A: It is powered via USB from your phone, tablet, or computer.
**Q: Does it have a built-in battery?**\
A: No, it doesn't by design. It makes the Go lighter, easy to ship, and safer to travel with. And you don't need to worry about charging yet another device and monitoring its battery health.
**Q: Does the Go connect wirelessly to iPhone?**\
A: No. It uses USB-C connection for data communication with your phone and it is also powered from the phone. We maintain a [list of supported devices here](/hardware/wlan-pi-go/supported-mobile-devices).
**Q: How much power does it draw from my iPhone?**\
A: Idle WLAN Pi Go uses about 1.5 Watts. Scanning for Wi-Fi networks, it uses about 2 Watts. During the USB Power Delivery negotiation, it requests up to 900 mA.
**Q: Any advantages over WiFiMan Wizard?**\
A: Yes! WLAN Pi Go has Intel BE200 Wi-Fi adapter and supports Wi-Fi 7 including the 6 GHz band. It allows you to scan or capture frames on either 2.4 GHz, 5 GHz, or 6 GHz channel. With the optional Oscium Lucid spectrum analyser, it also supports tri-band spectrum analysis. Same as all other WLAN Pi models, the Go is open source. Its API allows you get raw data off the unit, and use them in your script or app.
**Q: How to update software on my Go?**\
A: The WLAN Pi iOS and Android app allows you to upgrade software of your WLAN Pi Go. Connect your Go to your phone, connect your phone to a fast Wi-Fi network, and kickstart the update from the app. Follow [these instructions](/hardware/wlan-pi-go/software-update). This process retains home folder of the wlanpi user on the Go. Contents of the boot and root partitions will be erased - that shouldn't be a problem at all unless you have customised some system-level settings manually.
**Q: Can I connect it to a laptop?**\
A: Yes, you can. Not all features will be supported though. It is designed to be a mobile tool. WiFi Explorer Pro on macOS and Windows, and Airtool on macOS, allow you to connect to the WLAN Pi Go via USB and perform Wi-Fi scanning and packet capture respectively.
**Q: What iPhones does WLAN Pi Go support?**\
A: Please review this list. If you are using a device which is not on our list yet, please do let us know. We will add it.
**Q: Can it scan using the iPhone built-in Wi-Fi adapter?**\
A: No, Apple doesn’t provide access to the built-in Wi-Fi radio of the iPhone.
**Q: Where can I learn how to use WLAN Pi Go? Is any training available?**\
A: Attend our WLAN Pi Go Deep Dive at the Wireless LAN Professionals Conference, learn everything about the Go by doing, and walk away with your very own unit. That’s 6 hours worth of hands-on training and practical labs.
**Q: Can I label my WLAN Pi Go?**\
A: Yes, here are the dimensions of the recessed area on the back side of the unit.
**Q: What is the male USB-C port for?**\
A: It takes Oscium Wi-Spy Lucid USB tri-band spectrum analyser and enables spectrum analysis (not just Wi-Fi) on WLAN Pi Go. Software support for this feature is coming later.
**Q: Oops, something has gone wrong, how can I restore factory defaults?**\
A: Yes. But before you continue reading, save any data you might have saved on the Go. **This process wipes all contents and data stored on the Go unit.** Restore factory defaults by flashing the original software image by following [these instructions](/hardware/wlan-pi-go/restore-factory-defaults).
**Q: Why are only some Android devices supported?**\
A: Not all Android devices support Ethernet over USB-C (also known as OTG). Also, not all Android devices provide enough output power via USB-C. Check [list of supported mobile devices](/hardware/wlan-pi-go/supported-mobile-devices) which we have tested for compatibility with the Go. From software perspective, some mobile apps like WiFi Explorer Pi are currently only available for iOS devices.
**Q: Do you plan to develop WiFi Explorer Pi for Android?**\
A: No, we have no plans at the moment. Are you interested in developing one? Let us know.
**Q: What mobile apps support WLAN Pi Go?**\
A: It supports the WLAN Pi App, Airtool, and WiFi Explorer Pi.
# Supported mobile devices
Is my mobile device compatible with WLAN Pi Go?
## The short answer
As long as you own an iPhone or iPad equipped with USB-C port, your device is supported.
## The detail
Your mobile device must be equipped with USB-C connector to power the WLAN Pi Go. To establish data connection, it must support Ethernet over USB, often referred to as OTG (On The Go) mode.
We have successfully tested WLAN Pi Go with these devices. Drop us a note using the live chat on [wlanpi.com](https://www.wlanpi.com) if you have tested a device which isn't listed below. We will add it to the list.
{% hint style="info" %}
For full experience, use iPhone or iPad. Some apps like WiFi Explorer Pi are not available for Android.
{% endhint %}
### Supported Apple iPhones and iPads
| Device | Software version | Note |
| --------------------------------- | ---------------- | ---- |
| iPhone 15 | iOS 18.5 | |
| iPhone 15 Plus | iOS 18.5 | |
| iPhone 15 Pro | iOS 18.5, iOS 26 | |
| iPhone 15 Pro Max | iOS 18.5 | |
| iPhone 16 | iOS 18.5 | |
| iPhone 16e | iOS 18.5 | |
| iPhone 16 Pro | iOS 18.5 | |
| iPhone 16 Pro Max | iOS 18.5, iOS 26 | |
| iPhone Air | iOS 26 | |
| iPhone 17 | iOS 26 | |
| iPhone 17 Pro | iOS 26 | |
| iPhone 17 Pro Max | iOS 26 | |
| iPad Pro 11-inch (2nd generation) | iPadOS 18.1 | |
| iPad Mini 6th generation | iPadOS 26.0 | |
| iPad Mini 7th generation | iPadOS 18.5 | |
### Limited mobile app experience on Android
WiFi Explorer Pi mobile app is only available for Apple iOS devices.
While these Android devices are compatible with WLAN Pi Go from hardware and WLAN Pi App perspective, expect no scanning or spectrum analysis features on Android at this time.
| Device | Software version | Note |
| ---------------------- | ---------------- | ------------------------------------------------------------------------------------------------------------------ |
| Google Pixel 6a | Android | |
| Google Pixel 8 | Android 16 | |
| Google Pixel 9 | Android 16 | |
| Google Pixel 10 Pro XL | Android | Pixel 10 is the first Android device compatible with MagSafe. WLAN Pi Go successfully magnetically attaches to it. |
| Samsung Galaxy Tab S8 | Android 15 | |
| Samsung Galaxy S25 | Android 16 | |
### Supported laptops
Remote Sensor is the main use case for WLAN Pi Go connected to your laptop. This allows Airtool 2 and WiFi Explorer Pro running on your laptop to use the Wi-Fi 7 radio of WLAN Pi Go for packet captures and Wi-Fi scanning.
We tested these laptops and their capability to power WLAN Pi Go via USB and to establish Ethernet over USB.
| Device | Software version | Note |
| ---------------------------------------- | ------------------ | ------------------------------------------------------------------------------------------------------------------------------------------------------------------- |
| Apple MacBook Pro M2 | macOS Sequoia 15.5 | Natively via USB-C |
| Apple MacBook Air M4, 2025 | macOS Sequoia 15.5 | Natively via USB-C |
| Apple Mac Mini M4, 2024 | macOS Sequoia 15.5 | Natively via USB-C |
| Lenovo ThinkPad T440p | Windows 10 | Connected to USB-A port |
| Lenovo ThinkPad T470s | Windows 11 | Connected to USB-A port |
| Lenovo P16s | Windows 11 |
Only right hand USB-A port, or USB-C with charger symbol.
The other USB-A (no RNDIS device) or USB-C port doesn't work (RNDIS interface flaps).
|
| Dell Latitude 7420 | Windows 11 | Either USB-A or USB-C works |
| Framework Laptop 13 (AMD Ryzen 7040) | Windows 11 | USB-A expansion card works. USB-C expansion card does not. Works plugged into a USB-A port on a USB-C hub into the USB-C expansion card. |
| Surface Laptop 7 (Snapdragon X 12 ARM64) | Windows 11 |
USB-A port flaps the RNDIS interface. USB-C port adjacent to USB-A does not work (throws this device cannot start code 10 error) Far USB-C port works.
|
### Known **incompatible** mobile devices
These devices are not compatible with WLAN Pi Go. Please review this list before purchasing to avoid disappointment.
| Incompatible device | Software version | Note |
| -------------------------------------------------------- | ---------------- | -------------------------------------------------------------- |
| Google Pixel 4 | Android | |
| Google Pixel 4 XL | Android | |
| Google Pixel 6 | Android 15, 16 | No power provided to Go, WLAN Pi Go LED is off |
| Google Pixel 9 Pro | Android | Being investigated |
| Samsung Galaxy S23 | Android 15 | Powers the Go, heartbeat works, but OTG link doesn't establish |
| Samsung Galaxy S21 Ultra | | OTG doesn't establish |
| OnePlus 11 5G | | OTG doesn't establish |
# Software update
How to upgrade software of your WLAN Pi Go
{% hint style="danger" %}
Read before proceeding. Software update retains user data stored in the home folder of wlanpi user on the Go unit. All other contents of the boot and root partitions, including Profiler client device reports, will be erased.
{% endhint %}
1. Download the WLAN Pi mobile app for Apple iOS devices, and Adroid, to perform software update of your WLAN Pi Go.
2. Connect the Go unit to your phone via USB-C, and start the mobile app.
3. The app automatically detects the Go. Connect to it.
4. Check for updates.
5. If new software is available, connect to fast Wi-Fi connection and kickstart the process. The image size is about 1 GB, so you might want to do this over over Wi-Fi instead of 4G or 5G cellular data connection.
6. After 5 minutes or so, the app asks for permission to restart the Go unit to complete the software update.
7. As soon as the process completes, your WLAN Pi Go is ready for use.
# Restore factory defaults
WLAN Pi Go features built-in eMMC storage. In principle the software image flashing process is similar to SD card but there is no SD card.
{% hint style="danger" %}
Read before proceeding. This process completely erases all data and all system settings. Please backup any data or extra apps you might have stored or manually installed on the Go unit.
{% endhint %}
1. Disconnect the USB-C cable from the WLAN Pi Go.\
\

2. Place the Go on a desk with its back side facing up. Note the little hole providing access to the Reset button.\
\

3. Use a paper clip to **press and hold** the Reset button. USB-C cable is still disconnected.\
\

4. While still holding the Reset button pressed down, connect the USB-C cable to the WLAN Pi Go and your laptop.\
\

5. Wait for 5 seconds and then release the Reset button.\
\

6. Accept the security prompt and allow WLAN Pi Go storage to connect to your laptop.
7. Download [Balena Etcher](https://etcher.balena.io/) app to your laptop.
8. Download the latest WLAN Pi Go software image from [www.wlanpi.com](https://www.wlanpi.com/downloads) to your laptop.
9. Start Balena Etcher app. Select the software image. Select the Compute Module device which represents the WLAN Pi Go built-in storage.\
\
\

10. Press the Flash button and wait for about 10 minutes. Please make sure your laptop doesn't lock its screen. If it does, the flashing process might stop and you might need to restart it.
11. Once the image has been successfully flashed, disconnect the WLAN Pi Go cable from your laptop. It is now ready for use. Connect it to your phone, iPad or laptop and download the WLAN Pi Go mobile app.\
\

# WLAN Pi M4+
WLAN Pi M4+ uses the proven form factor of the [M4](/hardware/wlan-pi-m4) and adds these exciting new features:
* Native Wi-Fi 7 support using built-in Intel BE200 M.2 E-Key adapter
* Direct IP connectivity between your laptop/tablet and the WLAN Pi M4+ via USB-C OTG
* Soft-to-touch joystick cap with improved ergonomy
* Black (instead of the grey) plate around the display
WLAN Pi M4+
# WLAN Pi M4
### Use case
Modular, PoE powered, Wi-Fi 6E capable WLAN Pi. more affordable than the [WLAN Pi Pro](/hardware/wlan-pi-pro-eos).
### What is it?
Raspberry Pi Compute Module 4 (CM4) is the brains of a raspberry pi 4 but without any of the IO ports, instead we start with a 'carrier board' possessing the desired IO ports and we add a CM4 to it.
The board we are testing with the WLAN Pi CE is manufactured by 'Mcuzone', can be purchased from AliExpress [here](https://www.aliexpress.com/item/1005003823642614.html), the solution is still to be validated. We don't recommend ordering one just yet.
### Parts
* Sandisk Edge or similar 32 GB or larger micro SD card - From $10.99
* Raspberry Pi Compute Module 4 (we recommend one with built-in Wi-Fi, so we can use the bluetooth module)
* Mediatek MT7921K or MT7922 (Wi-Fi 6E module)
* antennas
* Waveshare screen and buttons
* GPIO riser
We have identified two Mcuzone carrier boards of interest!
### [**Mcuzone CM4\_wifi6\_PoE Expansion board**](https://www.aliexpress.com/item/1005003823642614.html)
$76 + $12 (shipping) Total $88 USD
Pros
* PoE power input
* Type-C power (limited, see below)
* 40-pin GPIO (requires pin header) for display connection
* Bluetooth works on MediaTek adapters (USB bus is internally connected to M.2 slot)
* Slightly smaller than the WLAN Pi Pro carrier board
Cons
* No OTG - you can't establish data connection between your laptop and the board via USB
* No Real Time Clock (RTC)
* Potentially limited type-C options, varied results in testing regarding power from Macbook Type-C to Type-C or PD charger
* Only one M.2 slot for Wi-Fi adapters
# Device Overview
#### Specifications / Technical Details
| SoC | Raspberry Pi Compute Module 4 |
| -------------------- | ------------------------------------------------------------------------------------------------------------------------------------------------------------------ |
| Memory | LPDDR4 RAM |
| Network | 1 GbE RJ45 (802.3af PoE) |
| Wireless | 1 x Wi-Fi 6E (2x2:2) MT-7921K module |
| USB | 3 x USB 2.0 Type-A connector |
| Storage | microSD 32 GB memory card |
| Display | 1.44 Color TFT LCD (128 x 128) |
| Other |
Activity indicator LED (green)
Power indicator LED (red)
4-way joystick with centre push
3 shortcut buttons
Standard size HDMI port
|
| Power Supply Options |
DC 5V via USB Type-C connector
802.3af PoE (via RJ-45 port)
|
#### LED Status Indicators
| LED | Location | Purpose |
| ------------ | --------------------- | -------------------------------------------------------------------------------------- |
| Power LED | Both case ends | Solid LED = device is powered on |
| Activity LED | Next to Ethernet port |
Blinking LED = Heartbeat, OS is initialized
Solid LED = hung
|
#### A brief look under the hood
Mcuzone WiFi6 PoE carrier board
# Accessories
# Powering options
## Power over Ethernet (PoE)
The M4 has built-in PoE circuitry. No additional power supply is required. This is the recommended option.
## USB-C port of your laptop
WLAN Pi M4 can also be powered by USB-C port of your laptop using USB-C to USB-C cable.
Some older laptops might not be able to provide enough power via USB. Please double-check.
USB-C to USB-C cable
## Apple USB-C PD MacBook chargers
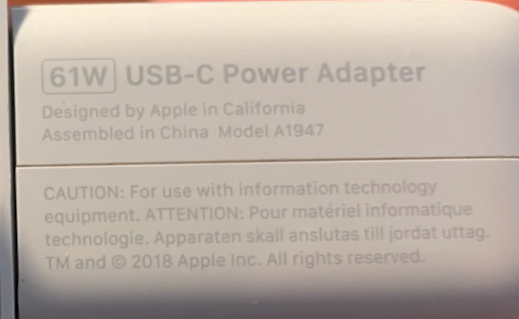
While some MacBook USC-C chargers will charge the M4, some won't.
Supported USB-C Apple MacBook 60W charger
This USB-C Apple won't work
## Power Distribution (PD) charger
A standard 5V USB-C PD charger is the best option.
### Warning
Please do NOT use non-PD power supplies with USB-C connector, that are not rated at 5V. Doing so will result in a magic smoke escape. We've tested that, so that you don't have to.
Incompatible 12V non-USB-PD power supply that fried our M4 unit
# Troubleshooting
# WLAN Pi R4
### Use case
Similar to the original WLAN Pi based on Nanopi NEO2, this model gives you a very similar Wi-Fi 5 (802.11ac) feature set. Simply order the parts and build your own. It is affordable and the hardware is widely available. Ideal for a leave behind use case, labs, cert study, and remote troubleshooting.

### Parts
* Raspberry Pi 4 Model B 2 GB or 4 GB - From $44.99
* Waveshare 128x128, 1.44inch LCD display HAT for Raspberry Pi - [Order](https://www.waveshare.com/1.44inch-lcd-hat.htm) here for $11.99
* MediaTek 7612U USB Wi-Fi adapter with Monitor mode support - [Order](https://www.aliexpress.com/item/4000048659616.html) here for $19.17
* Sandisk Edge or similar 16 GB or larger micro SD card - From $10.99
* Waveshare Lightweight Aluminum Alloy Case for Raspberry Pi 4 - [Order](https://www.waveshare.com/pi4-case-e.htm) here for $17.99
* WLAN Pi Fascia Kit (the orange and grey top of the case, button and joystick caps) - [Order](https://www.badgerwifi.co.uk/store/p/wlanpi-fascia-kit) here for $43
* **That's around $148 in total**


### Software support and features
[WLAN Pi OS](https://github.com/WLAN-Pi/pi-gen/releases) 3.0.1 or newer is required to support all components including the display and buttons out of the box.
Check what features are supported [here](https://userguide.wlanpi.com/hardware/compare).
### **Hardware**
\*\*Only use the MediaTek Wi-Fi adapter in the bottom USB 3.0 port (or any of the USB 2.0 ports). \*\***The adapter does not work in the top USB 3.0 port (highlighted in red).**

### Metal case (black part) assembly instructions
The case includes rubber feet, standoffs and thermal tape. [Here are the assembly instructions](https://www.waveshare.com/product/pi4-case-e.htm), just click [the link](https://www.waveshare.com/product/pi4-case-e.htm) and scroll down.
### Fascia Kit (orange part) assembly instructions
Fascia is the orange part of the case. [Follow this guide](https://www.badgerwifi.co.uk/store/p/wlanpi-fascia-kit) to install it.
# Device Overview
# Accessories
# Powering options
## USB-C Power Distribution (PD) charger
WLAN Pi R4 can be powered by USB PD power supply. We highly recommend using Raspberry Pi 4 Revision 1.2 or newer, which supports all USB PD power supplies including MacBook USB-C chargers.
To check your revision, SSH to the RPi4 and execute:
```
cat /proc/cpuinfo
```
Example of a compatible MacBook USB-C charger
## USB-C port of your laptop
WLAN Pi R4 can also be powered by USB-C port of your laptop using USB-C to USB-C cable.
Some older laptops might not be able to provide enough power via USB. Please double-check.
USB-C to USB-C cable
# Troubleshooting
# WLAN Pi Pro - EoS
WLAN Pi Pro is no longer manufactured.
# Getting Started
### Powering On
Momentary press (1 sec) to power on
look for constant red light, this indicates power
look for the heartbeat LED, this means the OS has been initiated
Then the screen will come to life
{% hint style="info" %}
The very first boot with a newly flashed SD card can take up to 60 seconds, be patient
{% endhint %}
### Powering Off
The recommended way to do this is to issue the `poweroff` command!This can be done:
* via the screen and buttons on the front (FPMS)
* CLI command
* Cockpit GUI
Or... Long press the power button (2 seconds)
{% hint style="warning" %}
This will force the device to power off without gracefully shutting down, which could result in data corruption
{% endhint %}
### Charging
| Input | Details |
| ----- | ---------------------------------------- |
| PoE |
802.3af compliant 12W (2A) Max
|
| USB | 5V input / 1.5A Max |
{% hint style="danger" %}
Do not use with Qualcomm QuickCharge (QC) power sources, these chargers have the ability to output greater than 5V which could damage components in certain scenarios.
For example, if the battery is completely flat when connected to a QC charger.
{% endhint %}
### Check battery level while off
Bump power button
### LED status indicators
PoE Indicator
Top
If illuminated, PoE is being received
Battery Level (4x)
Side
Battery charge level Charging state
Power LED
Side
Device is powered on
Activity LED
Side
Operating system is initiated
# Front Panel Menu System (FPMS)
{% hint style="success" %}
This is a 'homegrown' name, it came from the development team
FPMS refers to the screen & the buttons
{% endhint %}
### Display
1.5 inch Color OLED display
#### All the things it can display:
#### Header / top menu bar
* Time
* Internet status globe
* Bluetooth status
* Wireless interface status
* Battery status
#### Main Page
* Operating Mode
* Ethernet IP address
* Link connection speed
* Additional interface IP addresses
* USB
* Bluetooth
#### Footer
WLAN Pi hostname
### Buttons
You have 5x buttons at your disposal
* We think of this array as 4x navigational buttons up, down, left right
* Centre button is the 'enter action'
### What can I do with this FPMS?
* `System > About`
* `Battery`
* `Date / Time`
* `Summary`
* `Reboot`
* `Shutdown`
# USB Ethernet (OTG)
The following items are included with the WLAN Pi Pro:
* Braided USB-C / C cable
* USB-C / A adaptor
### Get Connected
1. Connect to WLAN Pi OTG USB port (top)
2. FPMS will display your WLAN Pi hostname and IP
3. Open up your browser of choice and navigate to
```
http://wlanpi-xxx.local
```
\
Alternatively you can use the link local IP address\\
```
http://169.254.42.1
```
{% hint style="info" %}
This`169.254.42.1` IP address will be the same every time
This is a statically configured link local IP address
{% endhint %}
# Web Front End
Navigation to the link local address `http://wlanpi-xxx.local` will bring you to the WLAN Pi landing page. Here you'll find several tabs, we'll reference these later on during the labs.
#### LibreSpeed - Network Segment speed test
* Lightweight speed test implemented in javascript that runs in a web browser
* Works on all modern browsers including mobile
Not to be confused with Ookla Speedtest (we have that too, in CLI form)
{% hint style="info" %}
If you were to perform a LibreSpeed test
What would you 'actually be measuring?
{% endhint %}
#### **Profiler**
Displays 'profiled clients' results
#### **Network**
WLAN Pi network information dashboard
#### **Admin (Cockpit)**
Web based graphical interface for managing Linux
#### **Terminal**
Direct link to the Cockpit Web Terminal
#### **Finally, In the lower right hand corner of this page**
You will see your WLAN Pi:
* Hostname
* System version
# Cockpit Admin GUI
1. Click on Admin
Unfortunately we do not have an SSL cert in place yet, please continue past the security warning
2. Login using the default 'first time boot' credentials\
\
`username: wlanpi`\
`password: wlanpi`\\
3. You will be prompted to change your password, you **have** to do this to proceed
{% hint style="info" %}
```
If you are stuck for ideas regarding the new password, for the duration of this Deep Dive **ONLY** consider using your WLAN Pi hostname `wlanpi-xxx`
```
{% endhint %}
4. The first time you login to Cockpit you will be in 'limited access mode'\
Look to the top-right corner of the WebUI interface\
Click on 'Turn on administrative access'
5. Now please have a poke around, explore what functionality is exposed by Cockpit GUI
### Updating your WLAN Pi
Most utilities / functions on the WLAN Pi can be updated through the built-in package management system. This is accessed via:
* Cockpit > Software Updates
* CLI > `sudo wlanpi-update`
```
sudo wlanpi-update
```
{% hint style="warning" %}
Checking for updates requires an internet connection
**STOP**
Don't plug your WLAN Pi into the ethernet cable just yet, please
We do not need to check for updates right now
{% endhint %}
#### When is re-imaging required?
System level updates will be made occasionally that may require re-imaging your microSD card
If you choose to re-image your SD card with the latest release of WLAN Pi OS, this will come with the latest version of all the default packages.
### Timezone Update
Click time, I think you can figure out the rest ;)
### Terminal
The menu option at the bottom of the left side panel is 'Terminal'
For the duration of the DeepDive this web based terminal is going to be our default method for accessing the WLAN Pi terminal
# Bluetooth Pairing
The WLAN Pi Pro has 2 built-in Bluetooth 5.2 radios, in this lab we will go through pairing a smart device to a WLAN Pi Pro to establish connectivity to it wirelessly.
1. Enable Bluetooth pairing mode on your WLAN Pi\
Via FPMS:\
\
`Bluetooth > Pair Device`
Your WLAN Pi will be discoverable for 30 seconds
2. Grab your smart device (iPhone/iPad, Android)\
We recommend using your mobile device for this lab rather than your laptop
3. Switch on Bluetooth and search for nearby Bluetooth devices
4. Be sure to select your WLAN Pi-xxx from the list of nearby Bluetooth devices
5. Be patient, your WLAN Pi may take 10-20 seconds to appear
6. If pairing is successful, FPMS will display a notification indicating the success
7. If unsuccessful, re-initiate the pairing process by selecting `Pair-Device` from FPMS
8. Navigate back to the 'home screen'
9. You should see `PAN: 169.254.43.1` displayed\
This is your Bluetooth network interface IP address
10. Open your mobile browser and navigate to the WLAN Pi webUI\
`http://wlanpi-xxx.local`
{% hint style="success" %}
You should see the WLAN Pi WebUI landing page
{% endhint %}
{% hint style="info" %}
If you were to perform a LibreSpeed test, right here and now
What would you 'actually' be measuring?
{% endhint %}
Once paired, you can easily disconnect and reconnect to your WLAN Pi by selecting it from the list of paired Bluetooth devices on your mobile device.
# Ethernet
Connect your WLAN Pi to the internet via the Ethernet port
1. Plug your WLAN Pi into the provided ethernet cable at your desk
2. This should bring the ethernet port up\
FPMS will confirm this by displaying the assigned IP address in white text\
Also see the negotiated link speed
3. Now that we have an internet connection we will run through the FPMS functions
* [ ] `Network > Interfaces`
* [ ] `Network > WLAN Interfaces`
* [ ] `Network > Eth0 IP Config`
* [ ] `Network >` Eth0 VLAN
* [ ] `Network > LLDP Neighbour`
* [ ] `Network > CDP Neighbour`
* [ ] `Network > Public IPv4`
* [ ] `Network > Public IPv6`
* [ ] `Utils > Reachability`
* [ ] `Utils > Speedtest` (this is not 'official Ookla Speedtest')
* [ ] `Utils > Port Blinker`
# Wi-Fi
Connect to your WLAN Pi via Wi-Fi
Another way to interact with your WLAN Pi is via Wi-Fi using 'Hotspot Mode'
# Remote Access
Using tailscale or zerotier
### Step 1 - Sign up for a Tailscale account
{% embed url="" %}
Tailscale signup link (Click on this link)
{% endembed %}
1. Follow the sign-up instructions
### Step 2 - Install Tailscale on your laptop
Follow the installation instructions from the Tailscale website
### Step 3 - Install Tailscale on you WLAN Pi
{% hint style="success" %}
Whenever instructions reference 'a terminal window' we mean terminal from within Cockpit!
{% endhint %}
1. Bring up your terminal window
2. Install Tailscale on your WLAN Pi\\
```
curl -fsSL https://tailscale.com/install.sh | sh
```
you will be prompted to enter your password\\
3. Log in to start using Tailscale by running command:\\
```
sudo tailscale up
```
4. Copy and paste the authentication URL into a new browser window
5. Authorise again
6. You will get the message `success` in your terminal window
The Tailscale client is now installed on both your laptop and your WLAN Pi! You should have local IP connectivity between your 2x devices via a Tailscale VPN tunnel.
### Step 4 - Connected Devices
1. Execute the following command in your terminal window\\
```
tailscale ?
```
This will reveal all the available Tailscale commands
2. View the devices currently connected to your Tailscale 'Node'\\
```
tailscale status
```
### Step 5 - Test local IP connectivity
From the list of connected devices, you will see the Tailscale IP address for each device
From your WLAN Pi try to ping your laptop 'Tailscale IP address'
{% hint style="info" %}
Alternatively you can quickly 'access' (copy to clipboard) the device IP addresses using the Tailscale client for Windows / macOS
{% endhint %}
This may not instantly strike you as an incredible!!!... right now, as you sit at the same desk as the WLAN Pi. BUT now imagine your WLAN Pi is away from you, on a customer site perhaps, with very little effort you can enable communication with it as though it were local to you.
## Access somebody else's WLAN Pi via Tailscale
One potentially *super useful* feature of Tailscale is 'device' sharing, this will allow you to 'share' your WLAN Pi access via Tailscale with another Tailscale user.
1. On your laptop, navigate and login to Tailscale
2. Find your WLAN Pi
3. Share your WLAN Pi with your DeepDive neighbour
4. Once your neighbour has accepted the invitation, test that connectivity is possible
5. Finally, revoke your neighbour's access
### Alternative VPN provider
If Tailscale is not doing it for you, we suggest giving ZeroTier a try (similar idea)
{% embed url="" %}
# Device Overview
 
### Tech Specs
SoC
Raspberry Pi Compute Module 4
Network
Gigabit-Ethernet RJ45 (802.3af PoE)
Wireless
Wi-Fi 6E (2x2:2) radio x 2 Bluetooth 5.2 radio x 2
USB
USB 3.0 Type-A connector x 1 USB 3.0 Type-C connector x 1 USB 2.0(OTG) Type-C connector x 1
Storage
Micro SD card slot x 1
Display
1.5" OLED RGB
Other
Real-time clock with battery PoE power indicator led Fan controller Power button
Battery gauge LEDs
5 navigation buttons
Power Supply
DC 5V (via USB Type-connector) PoE 802.3af (via RJ45 port) Battery rechargeable Li-on (3500mAh)
# Accessories
## WLAN Pi Pro Lanyard
This lanyard allows you to wear your WLAN Pi Pro, and use it as a battery-powered handheld unit.
### Parts
* 4x nylon flat washers size M3 x 8mm diameter x 1mm thick - Order locally
* 2x stainless steel M3 x 9 mm eye bolts - Order [here](https://www.aliexpress.com/item/1005001598740411.html?spm=a2g0s.12269583.0.0.79746e6f7rxhdK) or locally
* 1x orange lanyard with black text "WLAN Pi Pro" - Order [here in the UK](https://www.ebay.co.uk/itm/153428724765) or locally
### Instructions
1. Before installing the eye bolts to bottom Universal Mounting System (UMS), make sure to add 2 nylon washers on each eye bolt. **The washers are very important, because the eye bolts are too long. There is a potential risk of eye bolts getting to close proximity to the lithium battery cell.**
2. Screw the eye bolts into the UMS attachment points by hand. We have already installed M3 nuts to the WLAN Pi Pro case for you during manufacturing.
### Share yours
These accessories are brought to you by the WLAN Pi development team. If you have any ideas, or you have made your own, please tweet us a photo [@WLANPi](https://twitter.com/wlanpi), or use .
# Troubleshooting
# Won't charge
If the WLAN Pi Pro won't charge when connected to a power source (PoE or USB), it is likely it is in a low power protected mode to prevent over discharging the battery. To recover from this state follow the steps below, this will reset the charging IC and should allow the device to recover.
1\. Unscrew the 4 screws on the back cover, and carefuly remove the back
2\. Remove and reinsert the 18650 battery
{% hint style="warning" %}
Be sure to reinsert the battery in the correct orientation as reversing the battery will damage the circuit boar
{% endhint %}
3\. Reinstall the back cover and screws
4\. Connect a power source to PoE or the top USB-C port, verify the device is charging, and let it charge until it has at least 20% charge
5\. Power on device
# Won't power on
{% hint style="info" %}
Be sure the battery is at least 20% charged before attempting to power on the device, the device will not power on until the battery has at least 20% charge.
{% endhint %}
# Supported Wi-Fi adapters
## WLAN Pi M4
#### PCIe M.2 adapters
* **Recommended:** MediaTek MT7922 PCIe M.2 adapter
* MediaTek MT7921K PCIe M.2 adapter
WLAN Pi M4 has a single internal M.2 slot, which is already populated. To add a second adapter to M4, choose one of the USB adapters.
#### USB adapters
* **Recommended:** Comfast CF-951AX USB Wi-Fi 6E adapter (Device ID: 0e8d:7961)
* Comfast CF-953AX USB Wi-Fi 6E adapter (Device ID: 0e8d:7961)
* Netgear Nighthawk AXE3000 USB Wi-Fi 6E adapter (Device ID: 0846:9060)
* Alfa AWUS036AXML USB Wi-Fi 6E adapter (Device ID: 0e8d:7961)
## WLAN Pi R4
#### USB adapters only
* **Recommended:** Comfast CF-951AX USB Wi-Fi 6E adapter (Device ID: 0e8d:7961)
* Comfast CF-953AX USB Wi-Fi 6E adapter (Device ID: 0e8d:7961)
* Netgear Nighthawk AXE3000 USB Wi-Fi 6E adapter (Device ID: 0846:9060)
* Alfa AWUS036AXML USB Wi-Fi 6E adapter (Device ID: 0e8d:7961)
WLAN Pi R4 has no internal adapter enabled (because the built-in one doesn't support Monitor mode), and it requires one of the above USB adapters.
WLAN Pi R4 has no M.2 slots. USB adapters are the only option.
## WLAN Pi Pro - EoS
#### PCIe M.2 adapters
* **Recommended:** Intel AX210 PCIe M.2 adapter
#### USB adapters
* Comfast CF-951AX USB Wi-Fi 6E adapter (Device ID: 0e8d:7961)
* Comfast CF-953AX USB Wi-Fi 6E adapter (Device ID: 0e8d:7961)
* Netgear Nighthawk AXE3000 USB Wi-Fi 6E adapter (Device ID: 0846:9060)
* Alfa AWUS036AXML USB Wi-Fi 6E adapter (Device ID: 0e8d:7961)
# Overview
WLAN Pi OS is built on top of the official Raspberry Pi OS. WLAN Pi OS includes specific customizations for the WLAN Pi Pro hardware and comes pre-loaded with a full suite of tools for Wi-Fi professionals. It runs on the WLAN Pi Pro hardware but also on any Raspberry Pi hardware that is 64-bit compatible.
Raspberry Pi OS is a free operating system based on Debian, optimized for the Raspberry Pi hardware, and is the recommended operating system for normal use on a Raspberry Pi. The OS comes with over 35,000 packages: precompiled software bundled in a nice format for easy installation on your Raspberry Pi.
# Getting Started
## The basics
WLAN Pi is at it's core a Linux box. We aim to provide a suite of tools out of the box to help with Wi-Fi focused tasks, but there is flexibility for you to do almost anything you want.
##
# WLAN Pi Profiler
Profiler is a station capability analyzer. It automates the collection and analysis of association frames which contain a stations claimed capabilities.
One of the many challenges we face working with Wi-Fi is determining the 'actual' capabilities of a Wi-Fi device. Mike Albano ([@mike\_albano](https://twitter.com/mike_albano)) maintains a database of device capabilities over at [clients.mikealbano.com](https://clients.mikealbano.com)
{% hint style="info" %}
Where does this information come from? The clients themselves!
{% endhint %}
When a Wi-Fi station attempts to associate to an AP, the station will share capability information so that the AP can communicate with the station efficiently. This capability information is not always published or easy to locate, WLAN Pi Profiler makes the gathering of this detail a breeze!
WLAN Pi Profiler works like this:
1. Makes use of Scapy (python library) to create a "fake" access point by transmitting specifically forged beacon frames
2. Listens for an association frame, decodes the frame and parses out the relevant Wi-Fi capability information about the device
Device information that Profiler can reveal:
* 802.11k/r/v/w support
* 802.11n/ac/ax support
* Max No. of Spatial Streams
* Beamforming support
* Supported MCS Rates
* Max Tx Power
* Supported 5 GHz channels
### Step 1 - Start Profiler
Profiler can be initiated via Front Panel Menu System or the command line interface
#### FMPS
1. Navigate: `Apps > Profiler > Start`
2. Screen displays: `Starting...`
3. Wait 3-6 seconds
4. Screen displays: `Success, Profiler started.`
{% hint style="danger" %}
\_W\_atch out for non-transmission on default 5 GHz channel in many regions
{% endhint %}
#### CLI
1. Open your web browser of choice
2. Navigate to
3. Change **xyz** to match your own WLAN Pi
4. Click on the **Admin** tab
5. Login with your WLAN Pi credentials
6. Display 'all' the available Profiler commands:
```
sudo profiler -h
```
7. Activate Profiler on a channel of your choosing:
```
sudo profiler -c 48
```
### Step 2 - 'Profile' a Wi-Fi device
#### Smart device capable of reading a QR code
1. Via FPMS navigate: `Apps > Profiler > Status`
2. Scan the QR code with your iPhone/Android smart-device
3. 'Action' the discovered Wi-Fi network by tapping on the pop-up\
This 'should' initiate an attempt to associate with your WLAN Pi 'fake AP'
{% hint style="danger" %}
The association will fail! This is expected behaviour
{% endhint %}
{% hint style="info" %}
If nothing happens after 10 seconds consider repeating the process, scan the QR code again, Profiler does not forge and transmit beacon frames every 102.4 ms
{% endhint %}
When an association attempt is successfully captured FPMS will indicate this with message:
`Device Profiled xx:xx:xx:xx:xx:xx`
#### Less smart device 'incapable of QR code association'
1. Via FPMS Navigate: `Apps > Profiler > Status`
2. Take your device and attempt to associate to the SSID displayed on the WLAN Pi screen\
\
`SSID: wlanpi-xyz`\
`passphrase: does_not_matter`
{% hint style="success" %}
What you enter as a passphrase is not relevant!\
You can enter any string of at least 8 characters you wish, when prompted for the PSK. You may get a message warning you that the passphrase is incorrect, this is expected behaviour. The goal is getting the client device to transmit an association request frame which contains the information we seek.
{% endhint %}
{% hint style="info" %}
It may take your device a few scans before it detects the profiler SSID. The way Profiler forges and transmits beacon frames they are not consistently transmitted every 102.4ms.
{% endhint %}
### Step 3 - Analyze the results
1. Open a new tab, in your chosen browser
2. Navigate to
3. Click on the **Profiler** tab, from here you can:
1. View test results within the browser window
2. Download the association request pcap\
Open the pcap in your packet analysis tool of choice
### Step 4 - Profile that same device again
1. Profile your primary device again, what happens?
2. Enable Low Power mode on your primary device (if you can)
3. Profile your primary device again, what happens? What is different now?
### Step 5 - Profile the other frequency band
Profiler is only able to capture device capabilities for the frequency band on which you are broadcasting the 'fake AP'. Profile a device on the 'other' band.
#### FPMS
1. Stop Profiler, navigate to `Apps > Profiler > Stop`
2. Start Profiler on the 2.4 GHz band, `Apps > Profiler > Start on 2.4 GHz`
#### CLI
1. Stop Profiler with command
```
sudo profiler stop
```
2. Start Profiler on specific channel (from the other frequency band)
```
sudo profiler -c 11
```
### Step 6 - Profile Additional Devices
Test any and all other devices you have with you to capture and view their capabilities on both frequency bands.
### Step 7 - Download Profiler Report
Navigate your way to the Profiler section of the WLAN Pi web GUI, download the report CSV.
This includes all the data you just collected. You should see a separate report for each frequency band.
### Step 8 - Share your results
1. Browse to and look through the list
2. Check whether any of the devices you profiled just now are absent from the list? If you wish to share your profiled device capabilities:
1. Click on the menu item “How to Contribute”
2. Skip to step 2
3. Continue to follow the on-screen instructions
Learn more about usage and the details from the `wlanpi-profiler` repository.
{% embed url="" %}
# WLAN Pi Chat-Bot
Telegram Chat-Bot To interact with WLAN Pi remotely or headless
As the WLAN Pi Community Edition as no OLED display, an alternative option to view status information is set up a Telegram bot to remotely query the WLAN Pi CE.
Instructions for the setup and use of the chat-bot module are included in the link provided below.
Note that chat-bot is provided as an optional module for the WLAN Pi, so you will need to download it before it is available for use. SSH to your WLAN Pi CE and perform the following commands:
```
sudo apt update
sudo apt install wlanpi-chat-bot
```
{% embed url="" %}
# Kismet
A wireless network and device detector, sniffer, wardriving tool, and WIDS (wireless intrusion detection) framework
## What is kismet?
Kismet is a monitoring tool for wireless - originally only supporting 802.11 Wi-Fi, with the right hardware Kismet can now capture Bluetooth advertisements, BTLE, nRF-based wireless mice and keyboards, weather stations, wireless thermometers, switches, smoke detectors, 802.15.4 / Zigbee, ADSB airplane transponders, AMR wireless power, water meters, gas meters, and more.
1. To start kismet, simply head over to terminal and type `kismet` then press enter\\
```
kismet
```
2. Kismet should now be running\
Leave it running
3. Open a new browser tab
4. Navigate to `http://wlanpi-xxx.local:2501`
5. Login to kismet\
Before you can access kismet, you will need to create a username and password
# Packet Capture
The WLAN Pi Pro includes two (2) Wi-Fi modules capable of capturing Wi-Fi traffic. Not only are they capable (support monitor mode) but they are both 2 SS, 802.11ax, **6GHz** capable Wi-Fi modules. This provides great flexibility in capturing just about any Wi-Fi frames you might need to analyze for troubleshooting, testing, or validation.
### macOS method
* [ ] AirTool2 - Paid tool, but includes 3-day free trial
* [ ] Wireshark
### Windows method
* [ ] Wireshark + sshdump plugin
* [ ] Python
* [ ] wlan-extcap
### iOS method
* [ ] iPhone or iPad
* [ ] Testflight App
* [ ] Airtool Pi App (not yet available on App store)
# Using macOS
You run a mac, fantastic, first install [Wireshark](broken://spaces/xzXEUPabNPWCoRaNWam2/pages/sDdbYtKos7OeNJe385NZ) and then [Airtool 2](broken://spaces/xzXEUPabNPWCoRaNWam2/pages/GPAeYsa4gCPDX4wN7Stg)
{% hint style="info" %}
Airtool is an inexpensive packet capture tool for macOS
It is available with a 3-day free trial
{% endhint %}
Airtool can perform 'local' and remote Wi-Fi packet captures using a capable Linux box with a compatible Wi-Fi adapter such as... the [WLAN Pi](http://www.wlanpi.com/). Airtool 2 makes it possible to perform affordable, multi-channel captures using multiple remote sensors and Wi-Fi adapters.
### Download and install Airtool 2
{% embed url="" %}
Do this, do it now!
{% endembed %}
### Launch Airtool
1. Verify Airtool is running in your menu bar (Wi-Fi icon with a wrench spanner
2. Configure Airtool 2 Preferences
`Airtool dropdown > Preferences`
### Capture using a remote sensor
Remote captures are achieved using *SSH* to connect to the remote device. When *Airtool 2* connects to the device using *SSH*, it remotely executes a series of commands to capture Wi-Fi traffic. These commands drop the device's Wi-Fi adapter (e.g., `wlan0`) into *monitor* mode, set the desired channel and channel width, and then runs [`tcpdump`](https://www.tcpdump.org/) to capture and send the Wi-Fi frames back over to *Airtool 2* via the *SSH* connection.
Because *Airtool 2* will use the remote device's main Wi-Fi adapter for capturing, *Airtool 2* needs to connect to the device using a wired connection or a secondary Wi-Fi adapter.
If you were to do this using a secondary Wi-Fi adapter, ensure the channel you will be capturing is **not** the same as the Wi-Fi adapter being used for device access.
All *Airtool 2* features (automatic frame slicing, capture size limits, file rotation, live captures, etc.) are available when capturing using a *remote sensor* in the same way as when capturing using the built-in Wi-Fi adapter.
### Using a sensor
To use a *remote sensor*, go to *Preferences* > *Sensors* and add a new sensor. You will need the hostname or IP address of the sensor. If the sensor is not configured to use the standard SSH port (TCP port 22), then you need to specify the correct port number in the *Port* field. Then, choose the sensor from the *Airtool 2* menu to start the remote capture.
{% hint style="info" %}
*Airtool 2* discovers [WLAN Pi](http://www.wlanpi.com/)-based remote sensors deployed in your local area network automatically
{% endhint %}
Before the capture starts, you will be prompted to enter the name of the wireless interface you wish to capture on remotely (e.g., `wlan0`) and to select the channel and the channel width.
{% hint style="warning" %}
The remote wireless interface may not support some channels and channel widths. If the selected channel and channel width combination is not supported, the capture will fail, and you may choose to change the capture options and try again.
{% endhint %}
The first time you capture from the *remote sensor*, you will be prompted to authenticate using the remote device's SSH username and password. You can choose to have *Airtool 2* remember the credentials, so you don't have to enter them every time you do a capture. *Airtool 2* will store the credentials securely in your Mac's keychain.
### Managing sensors
To manage the sensors, go to `Preferences > Sensors`. You can add, edit or delete existing sensors, mark sensors as *favourite*, and change the sensors' order by dragging the entries in the list.
{% hint style="info" %}
If you mark the sensor as *favourite*, *Airtool 2* will list the sensor in the main menu for quicker access.
{% endhint %}
More details:
## Capture on multiple channels and remote sensors
You can also use *Airtool 2* to capture Wi-Fi traffic on multiple channels simultaneously by using multiple remote sensors or a single remote sensor with multiple Wi-Fi modules. *Airtool 2* generates a single capture file by merging the frames captured on each sensor based on their timestamps.
To ensure the correct merging of Wi-Fi frames from each sensor, *Airtool 2* requires all sensors to synchronize their time using NTP.
*Airtool 2* uses the [PCAP Next Generation (pcapng) Capture File Format](https://github.com/pcapng/pcapng). This format allows *Airtool 2* to annotate each frame with the sensor and interface name used to capture the frame. You can use this information to filter frames by sensor and interface name in [Wireshark](https://www.wireshark.org/).
You can also capture Wi-Fi traffic on multiple channels simultaneously using the same remote sensor if the remote sensor supports more than one Wi-Fi adapter. For example, if you have three remote sensors, and each sensor supports two Wi-Fi adapters, you can capture Wi-Fi traffic on six different channels simultaneously.
Advanced *Airtool 2* features, such as automatic frame slicing and live captures using [Wireshark](https://www.wireshark.org/), are also available for multi-source captures.
**Prepare for a multi-source capture**
You must first go to *Preferences* > *Sensors* and add any remote sensors you would like to use for multi-source captures. You only need to add a remote sensor the first time you use it. After that, the remote sensor will always be available for multi-source captures.
*Airtool 2* discovers [WLAN Pi](http://www.wlanpi.com/)-based remote sensors deployed in your local area network automatically.
Also, make sure you plug in at least one compatible Wi-Fi adapter per remote sensor and know the interface name assigned to it (e.g., `wlan0`) as you will need it when configuring the remote sensor for capturing.
**Start a multi-source capture**
1. Choose *Multi-Source Capture* from the *Airtool 2* menu.
2. Click the "+" button to add an entry for each remote sensor you want to use for capturing.
3. For each entry, configure which sensor, interface name, channel, and channel width you want to use.
4. Click "Start Capture."
*Airtool 2* won't allow you to start the capture if it detects an invalid configuration. For example, you cannot use the same sensor and interface name combination twice.
To reduce the amount of data sent back from a remote sensor, you can choose to limit each captured frame's size by enabling the "Limit each frame to" option and entering the desired frame size in bytes.
More details:
{% embed url="" %}
# Network Management
How to connect your WLAN Pi network adapters
This guide is for the setup and execution of the new interface management functionality within the WLAN Pi. WLAN Pi now has a centralised approach to managing connectivity via APIs. These APIs exist within the wlanpi-core package and they are updated periodically to introduce new features.
New interface management functionality is now in testing in the latest beta of wlanpi-core and implements the following:
1. The ability to configure wlan interfaces in managed or monitor modes.
2. Configure managed interfaces to connect to Wi-Fi Networks and keep that persistent through reboots
3. The ability to move wlan interfaces into their own ‘namespace’ for isolated use.
1. A network namespace is an isolated networking domain which network interfaces can be moved in or out.
2. An application can be instructed to run in a namespace and it will only find the adapters which have been made available in that namespace
### Managing Network Interfaces
Many applications can only connect to network via the default route. In the case of a WLAN Pi this can often be the ethernet interface.
One approach to managing the association between applications and the network interface they use is to group the applications with a network interface in what is known as a network namespace.
The example below illustrates how multiple network interfaces can be divided into namespaces, and applications setup to run in a namespace - forcing it to use the only adapter present.
# Making your own Namespace configuration
This guide walks through how namespaces can be setup and managed
As you now know, the WLAN Pi now supports automated management of namespace configuration.
To setup your WLAN Pi with the Namespaces functionality is a 4 step procedure
1. Install & configure the applications you want to run
2. Setup a link to those applications for use by the Namespace functions
3. Create one or more Namespace configuration(s)
4. Activate the configuration of your choice
Steps 1 & 2 are **pre-requisites** which the user must carry out directly on their WLAN Pi. This would usually be done with an SSH session.
Steps 3 & 4 are the **namespace configuration procedure** and can be managed from within the **WLAN Pi application**
# Pre-requisites - Setting up the applications
This section will guide the setup of your application so that is can be used by the automated Namespaces manager within the WLAN Pi. The Orb application will be used as a working example but you can replace this with any other applications
To setup with Orb, these are the pre-requisite steps.
### 1. Install the Application
{% hint style="info" %}
Note. These steps can be repeated for any application. Orb is used as an example of the process. Try applying it to other applications
{% endhint %}
Install you application using the application provider's recommended setup
To install Orb, follow the installation instructions here
The quick guide to this is as follows:
Install the application
```
curl -fsSL https://pkgs.orb.net/install.sh | sh
```
Open the required ports
```
sudo ufw allow 7443/tcp
```
### 2. Remove any auto started services
In the case or Orb, the installation process sets up a service which will always run. This can be very useful but seeing as the approach taken here is to run the Orb application within a Namespace of our choice, we need to disable the auto starting service.
In the case of Orb, the following command should be run
```
sudo systemctl disable orb
```
Enter the password if asked
### 3. Setup a Key by which the Namespaces functionality can run the application
To automate the execution of applications in your namespaces, there is a file called **apps.json** which maps a key to the application. this is a security measure to keep you in control of the applications which can automatically be run by the Namespace manager.
Using a map prevents the unwanted running of applications on your WLAN Pi.
The file needs to be created by editing the apps file in the correct location. This file can only be manually edited by the user on the device, to ensure it remains secure. It can be done in the following way.
`sudo nano /home/wlanpi/.local/share/wlanpi-core/netcfg/apps.json`
The file uses a json definition as follows —> key:execution path
For example, to run the Orb application, place the following into your file:
`{"orb": "/usr/bin/orb sensor"}`
Do this now if you intend to follow the tutorial later to setup an automated Orb application
Now your application is setup and can be accessed by the key you just created. Remember this as you will use it later in the Namespace configuration.
# Namespace configuration procedure
A Namespaces configuration is a valid json file stored in the following directory.
`/home/wlanpi/.local/share/wlanpi-core/netcfg/configs`
You can browse this directory (needs root access which you can get by running `sudo su`) and viewing the contents of any files in there.
The following tutorial will guide you through the simple setup using the WLAN Pi application.
## The WLAN Pi App Network Page
The WLAN Pi application now contains a Network management feature.
If this is not visible in your application, ensure that your WLAN Pi application is up to date and check in case the feature needs unlocking in settings (this will be the case while it is a beta feature).
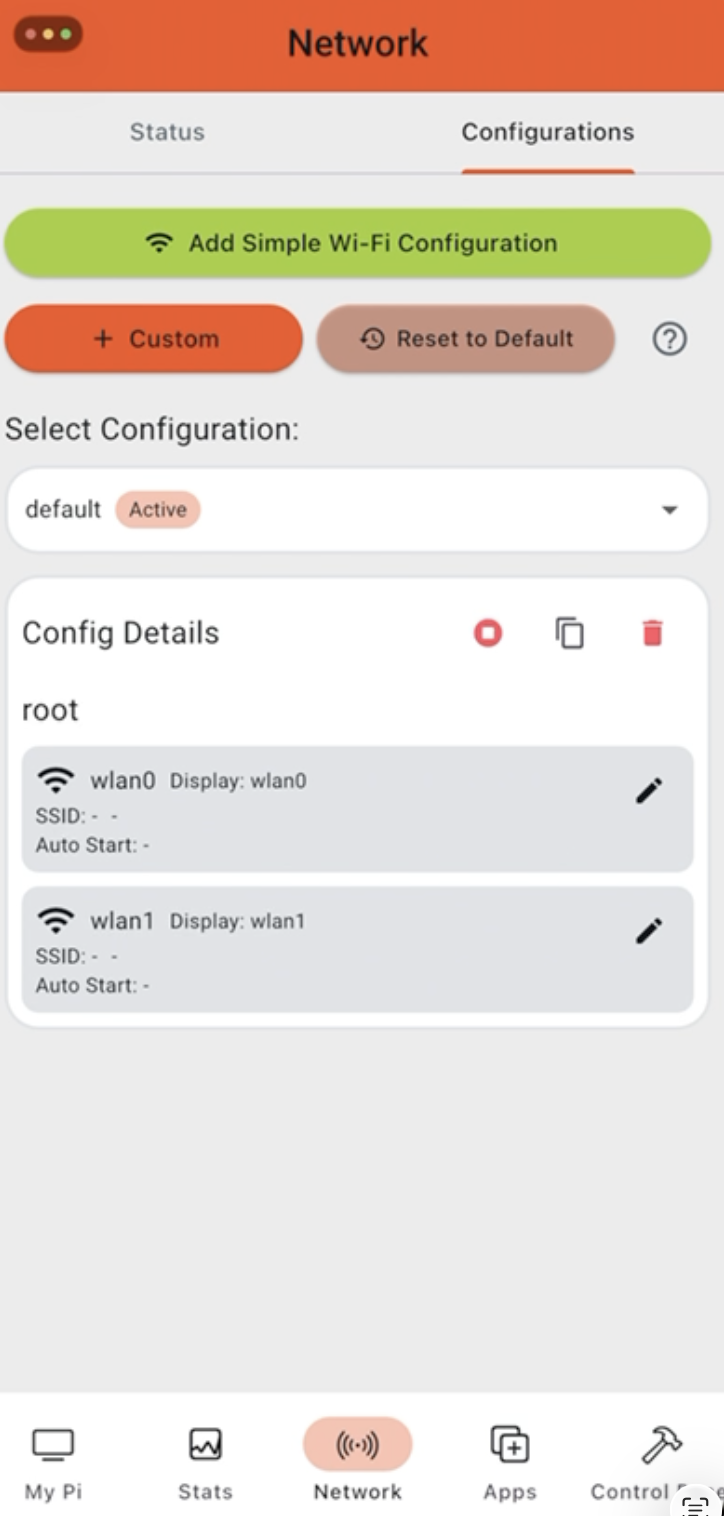
Navigate to the Network tab. You will see all your avaiable adapters and the state in which they are configured. The image below is the state found on a WLAN Pi with 2 adapters which has no prior Namespace configuration active.
The **Status** and **Configuration** tabs at the top of the page will switch between a review of the adapter state and the interface for setting up a Namespace. You might find that after performing actions, the application automatically navigates to the Status tab to display the results of the action
### The configuration tab
The configuration tab is where the following functions can be performed
* Setup of a simple Namespace configuration (recommended)
* Advanced setup of a Namespace configuration (not necessary in nearly all uses)
* Restoration of all adapters to their default state and removal of all Namespaces
* Activation/Deactivation of stored configurations
* Deletion and duplication of stored configurations
* Edit of stored configurations
### Setup a simple Namespace configuration
To setup a simple Namespace configuration, use the helper tool behind the green button
This assumes you want to connect at least one WLAN adapter to a network and auto-run an application in the same namespace, using this WLAN as default.
Pressing this will open the following set of helper stages:
#### 1. Prepare the WLAN Pi for a new configuration
To ensure a new configuration can be setup, any active configurations are deactivated. This ensures all the available interfaces appear as options for configuration.
Press **Proceed** and continue with the setup
#### 2. Select the Interface you want to connect to a Wi-Fi network.
The next step in the helper displays all the available interfaces to you. Select one which you wish to configure and connect to a Wi-Fi network
{% hint style="info" %}
If you are using the Orb application, this must be **wlan0** in order for Orb to detect as a wireless interface. This is a known bug and may well have been resolved by the time you follow this tutorial.
{% endhint %}
#### 3. Enter the Wi-Fi configuration
Enter the SSID and security details for the Wi-fi you would like to connect to. Currently this can be Open, WPA2 or WPA3.
#### 4. Setup application autostart
This is an optional step to setup an application which should auto run. This auto run will survive reboots all the while that this application is active.
{% hint style="warning" %}
The Application Name corresponds to the key created in the pre-requisites and must be entered exactly as it was entered.
If you have been following the Orb application tutorial, then you will have created the following configuration.
`{"orb": "/usr/bin/orb sensor"}`
The Application in this case will be **orb** - all lower case.
*This instructs the Namespace manager application to run the application '/usr/bin/orb sensor'*
{% endhint %}
#### 5. Setup Network Namespaces
In this step, you can put the setup just created (connection to Wi-Fi + an auto-starting application) into a Network Namespace. This will ensure the application sees only this configured interface and nothing else, forcing it to be used as the default route.
{% hint style="danger" %}
If you are following this tutorial and setting up Orb as the application, you must say |Yes to this question if you want Orb to test the wireless newtork you are connecting to.
If you do not say Yes, your Wi-Fi connection and the Orb application will remain in the default/root namespace and Orb will end up testing the default route which is likely to be the ethernet interface.
{% endhint %}
#### 6. Managing the remaining interfaces
You will be asked if you want to manage the other interfaces. If you have multiple adapters connected to your WLAN Pi, you can add them to the configuration here.
Selecting Yes will re-start the process for the next interface you choose. It is typical to only setup one namespace for simple applications.
{% hint style="info" %}
Note.
If you are intending on using a second wireless adapter in monitor mode with Wi-Fi Explorer or any other Wi-Fi scanning tool, then you can answer No to this question to leave the adapter in the root namespace.
**IMPORTANT**
Most Wi-Fi scanning tools (Wi-Fi Explorer, WinFi, Analiti and Hamina Onsite) are expecting to see an interface in the root namespace so you must leave one there if you want to use one of these tools.
{% endhint %}
#### 7. Check the functionality is correct
Upon concluding the setup, your configuration will be activated and the WLAN Pi app will go back to the Status page.
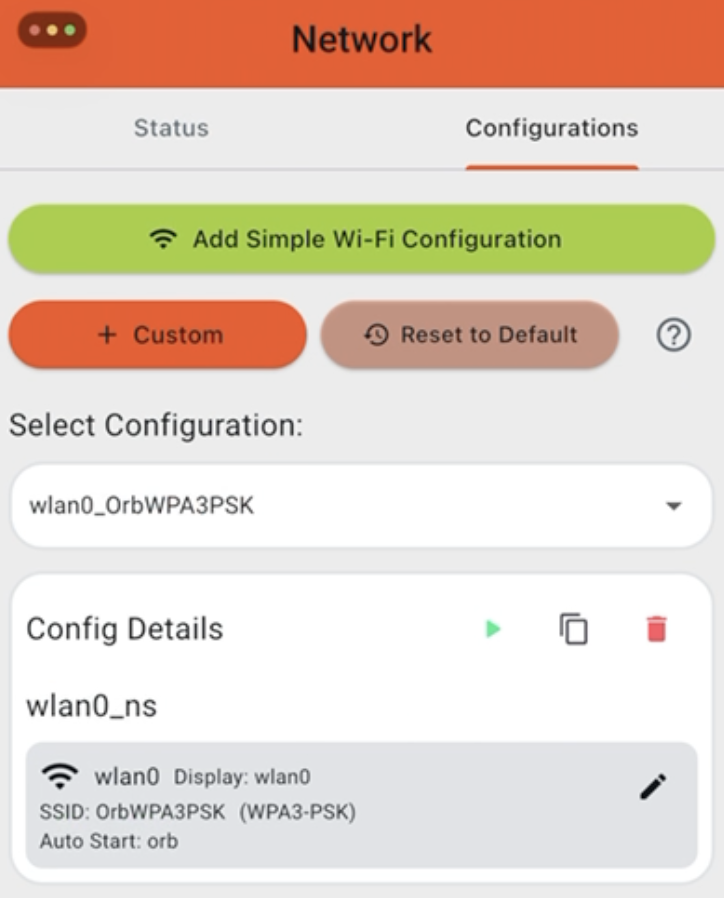
Wait a short time and you should see a different configuration of the interfaces, with an indication that the interface you configured is connected to the desired Wi-Fi (if it is available).
In the example below, wlan0 has successfully been moved to a new namespace (called 'wlan0\_ns') and is connected to the **OrbWPA3PSK** SSID.
Now check if your your application is running in the normal way.
# Managing the existing configurations
The Namespaces configurations can be managed in the following ways.
1. Reset to Default. This will deactivate any active configurations and place all your interfaces in a default state within the root namespace. All other namespaces will be deleted.
2. Select Configurations. This will display all the available namespaces in a drop down list and allow you to select one
3. Namespace config controls
1. The button will actve the selected namespace
2. The 'stop' button will deactive that namespace (only shows if active)
3. The button will duplicate this configuration, allowing you to make minor edits
4. The button will delete the configuration
5. The button will present the current configuration and allow you to adjust it (useful if a password is incorrectly entered)
# Example: WLAN Pi with Orb and Wi-Fi Explorer Pi
## How to connect Orb & inspect Wi-Fi at the same time
This is a demonstration of Namespaces in action. In this configuration, a WLAN Pi M4+ with two Wi-Fi adapters is setup to test a Wi-Fi network with Orb while simultaneously scanning the environment with WiFi Explorer Pi.
The tools used in this demo are:
* WLAN Pi App
* Wi-Fi Explorer Pi App
* Orb App
* A WLAN Pi with 2 Wi-Fi adapters
{% hint style="info" %}
To get 2 adapters you can use a R4 with 2 USB adapters or M4 with 1 USSB adapter and the internal adapter
{% endhint %}
You can follow along with this demo. You will be able to run both applications on a single device and manage the adapters whilst observing the connection tests on Orb and scans on WiFi Explorer Pi.
{% embed url="" %}
# Network Configuration API
The API commands needed to manage the Wi-Fi configuration
The WLAN Pi now uses APIs for management within the wlanpi-core package. Core is responsible for the central management of the WLAN Pi configuration and it's interfaces.
The API documentation can be found by navigating to the following URL on your WLAN Pi
```
http://wlanpi-cda.local:31415/docs
```
"network\_config" is the API set responsible for managing the configuration of adapters.
{% hint style="danger" %}
Note: There is also a "network" API which has some legacy adapter management functionality. This is now deprecated and should not be used
{% endhint %}
# Wi-Fi Scanner
# Wi-Fi Explorer Pro
{% embed url="" %}
# Wi-Fi Scanner
{% embed url="" %}
# Modes
# Classic Mode
Classic mode is the default mode of operation of the WLAN Pi. Find out more about modes below.
"Classic" mode is the default mode that WLAN Pi boots into with a fresh OS install. It is the mode that is most likely used for 90% of the use-cases that you will have for the WLAN Pi.
The WLAN Pi may be switched in to a number of "modes" that change the primary operating characteristics of the device. This is generally required to change the fundamental networking characteristics of the WLAN Pi Pi to provide a specialized feature that would otherwise clash with the networking setup required for standard, day-to-day operation.
When the WLAN Pi is powered on, the home screen show on the front panel provides useful status information about the unit. If the home screen displays the title "WLAN Pi Pro", then your unit is in Classic mode. When switched to other modes, the current mode is displayed as a title on the home screen.
To switch to other modes, use the menu system on the WLAN Pi. Use the navigation buttons to select the required mode from the "Modes" menu item. Note that the WLAN Pi will reboot when switching between modes.
The other mode available are:
\- [Server Mode](/wlan-pi-os/modes/server-mode): a lab network server to provide miscellaneous useful functions
\- [Hotspot Mode](/wlan-pi-os/modes/hotspot-mode): a simple wireless access point
\- [Wi-Fi Console](/wlan-pi-os/modes/wi-fi-console): a wireless CLI console
# Server Mode
Turn your WLAN Pi into a DHCP server, TFTP server and terminal server (Wi-Fi Console) at the same time
The WLAN Pi server mode enables use cases like lab build, software upgrade of your network appliances or AP and staging with no additional servers or apps. Simply plug your WLAN Pi into your lab switch and let it provide all services.
View the instructions for server mode here:
{% embed url="" %}
# Hotspot Mode
Turn your WLAN Pi in to a test AP
The WLAN Pi hotspot mode has been created to provide a quick and dirty wireless AP for tasks such as wall attenuation measurements. It will also allow a temporary wireless connection when you'd like to hook up to a switch ethernet port and extend the network connection out to a wireless client. Finally, it can be used to provide wireless access to the WLAN Pi itself if an OTG or Ethernet connection is not available.
Visit the article below to get the full details on Hotspot code:
{% embed url="" %}
# Wi-Fi Console
Turn your WLAN Pi in to a wireless serial console cable
It can be annoying to have to sit in an equipment room to use the serial console port on an item of networking equipment. This module allows you to use a WLAN Pi to connect to your serial console cable via a Wi-Fi link while sat in the comfort of a nearby office, rather than sat with your laptop on the equipment room floor :)
Visit the link below to view the user guide for this package:
{% embed url="" %}
# Bridge Mode
# FAQ
# Default password
## What is the default username and password?
| Username | Password |
| -------- | -------- |
| wlanpi | wlanpi |
{% hint style="info" %}
On first boot you'll be required to change your password before you can use any features that require login (Ex. Wi-Fi Explorer Pro Sensor)
The new password can not be the same as the default password
{% endhint %}







 button will actve the selected namespace
2. The 'stop' button will deactive that namespace (only shows if active)
3. The
button will actve the selected namespace
2. The 'stop' button will deactive that namespace (only shows if active)
3. The  button will duplicate this configuration, allowing you to make minor edits
4. The
button will duplicate this configuration, allowing you to make minor edits
4. The  button will delete the configuration
5. The
button will delete the configuration
5. The  button will present the current configuration and allow you to adjust it (useful if a password is incorrectly entered)